Mobile Photography
18.1K views | +0 today
Follow
Mobile Photography
News about mobile and digital photography, photo apps, effects, tips and photo galleries
Curated by Hovhannes
Your new post is loading...
Scoop.it!

Quick Photography Lighting Considerations

Quick Photography Lighting Considerations | Mobile Photography | Scoop.it

Refined photography uses distinct lighting strategies. Knowing what to look for is essential when the goal is a unique and artistically stylized photograph. To be creative you have to know the basics. Creating a foundation from which to build on your basic expertise requires close attention, experimentation, patience, and passion for your media. Photography sets the tone for many moments in time and is a representation of merriment, beauty, nature, perseverance, growth, knowledge, resistance, change, and many other aspects related to a viewer’s perception. Choosing the right lighting strategy in a photograph sets the right mood to enhance perceptions and deliver stronger messages.


Here are some photography lighting strategies that will help differentiate your photos from mediocre snapshots and will help you master key fundamentals in no time at all:

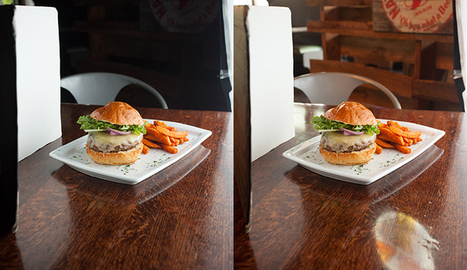
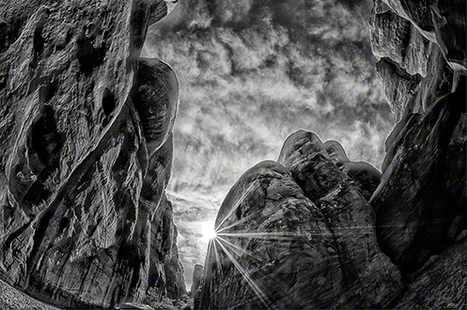
  • Projecting a wider light source generates a softer light and subdues shadows. Casting a narrower light generates a harder light and sharper shadows. The wider light source diffuses the scene de-emphasizing shadows, textures, and contrast. The narrower light can enhance features by creating sharper shadows, increasing contrast in color, shape and form, and accentuating textures to give them a three-dimensional look.
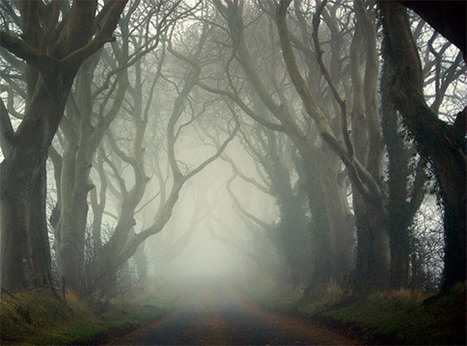
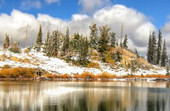
  • Diffusion disperses a light source, making it wider and softer. Clouds are a perfect example of a natural diffuser. When a cloud covers the sun’s natural light, it softens a shadow’s crispness. Three types of diffusion are clouds, overcast skies, and fog.
  • Intentionally bouncing or directing a light source pointed toward a matte surface such as a ceiling or a white wall can also act as a diffuser. The light will spread and cover a wider area.
Kitty Fisher's insight:

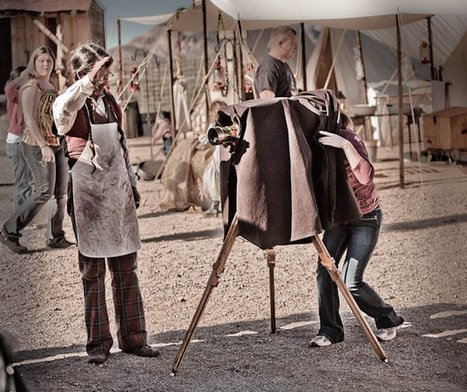
Lighting, when I was in Photography School that was all I heard. Lighting can create the effect you want, brighten or darken to exactly the calibrations you desire to show up in your photography. If you want to move pass that mediocre aspect, trying out these different techniques available to you, will do the job.

No comment yet.
Scoop.it!

6 Tips for Creating Unique and Emotion Filled Wedding Photos

6 Tips for Creating Unique and Emotion Filled Wedding Photos | Mobile Photography | Scoop.it

It’s important to assess whether a client is the right match for your photography style and the stories you’re good at capturing. When you’re consulting with clients, ask questions about what exactly they want, and consider whether you’re prepared to offer the services they want. Once you’ve decided to work with a couple, cultivate a positive, communicative relationship. You don’t have to be best friends with every couple that you shoot, but a basic level of trust helps clients to be themselves on the wedding day. The more comfortable they feel with you, the more moments you’ll be invited to shoot.

If an image is too soft or technically imperfect, you can’t share it with clients. A poor image of a great moment is essentially the same thing as no image at all. Remind yourself of the basics both before and during a shoot. Be mindful of focusing and recomposing with the f-stops you choose, and make sure your shutter speed correlates with the lens you’re using.
Kitty Fisher's insight:

When it comes to your own wedding, a friends or a clients...to me capturing a moment that is full of emotion or the photographs that people will keep for years. When a father sees his daughter for the first time in her wedding dress or when the groom sees the bride walk down the aisle...or even the smaller moments. Whichever they are, knowing a few tricks could help you to capture a set of images that these individuals will never forget, is a photographers honor.

No comment yet.
Scoop.it!

DSLR Photo Tip: What The Heck Is Back Button Focus?

DSLR Photo Tip: What The Heck Is Back Button Focus? | Mobile Photography | Scoop.it
Today’s DSLR photo tip continues with our series of tips covering functions on your camera that you are most likely not using. Let’s talk about back button focusing.

Have you ever tried to photograph a scene in low light conditions? Often the lens can’t find the focal point and will keep moving back and forth trying to find something to focus on. By the time it actually does focus on something, the shot has long since passed. Not to mention that the final focus isn’t always where you want it to be.

In other words, once you set up your camera for back button focusing, when you depress the shutter half way, it doesn’t affect the focus. You can focus with the back button and the focus point will stay the same no matter how many shots you take and even if you change the exposure settings.

Now, in that low light situation, you set the focus once and you don’t have to keep re-finding it. You can set your focus to have blurry shots if you want them, and pre-focusing on a certain spot is no problem.

Kitty Fisher's insight:

Ever wondered what a Back Button Focus was? And how it could help you to improve the way you shoot in low light? Affecting the focus can setup your whole shot, depending on how many shots you wish to take. If you focus right, you won't have to keep re-focusing on your subject if your objective is multiple images.

No comment yet.
Scoop.it!

360 Product Photography Tips using iPhone and iPad

360 Product Photography Tips using iPhone and iPad | Mobile Photography | Scoop.it
Creating 360 product photography spins is really easy with this new free iPhone and iPad App from Arqball and Modahaus Tabletop Studios.

Via jack hollingsworth
Scoop.it!

Adventure Photography Tips: Four Tricks to Supercharge Your Photos (3 of 3)

Adventure Photography Tips: Four Tricks to Supercharge Your Photos (3 of 3) | Mobile Photography | Scoop.it

"See Tim Kemple’s previous photography tips >>Use the foreground to draw the viewer’s eye into the picture. I like to call it a third layer–with the subject and background being the other two. The foreground draws in the viewer, the subject captures their attention, and the background tells a story about the place. It’s a pretty reliable formula (if there is such a thing for photography) and can be used with any equipment."

Kitty Fisher's insight:

To be able to capture that National Geographic worthy photo, a series of elements must come into play.

No comment yet.
Scoop.it!

Balancing Flash and Ambient Light In A Restaurant

Balancing Flash and Ambient Light In A Restaurant | Mobile Photography | Scoop.it
Restaurant's interiors can be just as beautiful and recognizable as the dishes that they create. When shooting a dish, you may want to include some of a restaurant's interior elements in the shot. ...
No comment yet.
Scoop.it!

5 Landscape Photography Tips for Photographing Mountains

5 Landscape Photography Tips for Photographing Mountains | Mobile Photography | Scoop.it
After graduating from photography school, I spent a good deal of my 20s photographing the city scapes of New York. In my 30s, after I relocated to upstate New York, I discovered a new muse–the landscape.
No comment yet.
Scoop.it!

A Simple Explanation of How ISO Works in Digital Photography - PetaPixel

A Simple Explanation of How ISO Works in Digital Photography - PetaPixel | Mobile Photography | Scoop.it
A Simple Explanation of How ISO Works in Digital PhotographyPetaPixel... Khan's soothing voice, but he does his best to break down the magic of digital camera sensors into easy to understand ideas.
No comment yet.
Scoop.it!

Take control sharpening in Photoshop | Digital-Photography-School

Take control sharpening in Photoshop | Digital-Photography-School | Mobile Photography | Scoop.it


Most people who have experimented in Photoshop, especially those who shoot in raw, will have some experience of trying to sharpen an image. Sharpening increases the contrast between neighbouring pixels resulting in the visual effect of a crisper image. It is typically the last processing step that should be performed on an image and is often used to enhance already well-focussed images or in desperation to try and rescue elements of a photograph that weren’t captured in-focus when the shutter was pressed. There are numerous ways to sharpen images in Photoshop, so much so that there is a whole sub-menu of filters dedicated to sharpening, each offering a different amount of control and different levels of success. However, one of the most overlooked filters that can help you achieve better results with more control isn’t found in the Sharpen sub-menu, but is in fact found in the, usefully named, Filter -> Other menu: the high pass filter. I’ll take you through a step-by-step guide to using high pass filter and hopefully show you how simple and effective image sharpening can be.....


The benefit of using this method to sharpen your images is that the sharpening effect is applied in a non-destructive fashion, on a duplicate layer, with a very simple to understand parameter (in the Radius value) that controls the magnitude of the sharpening, as well as giving you the ability to fine tune the final effect using the Opacity slider.


Via Thomas Menk
No comment yet.
Scoop.it!

5 Tips for Getting Sharper Images

5 Tips for Getting Sharper Images | Mobile Photography | Scoop.it

There are several things you can do to improve your chances of getting sharper images.


On most SLRs, and some of the mirror-less or four thirds cameras, there is an option of selecting what point it uses to focus. Meaning, when you look through the camera and see some flashing dots or squares (or something similar to the image on the right), those are your focus zones or spots. Make sure it is NOT set for the camera selecting which of those spots are targeted for focusing. When the camera chooses where to focus it can often pick the wrong thing. If you have a subject that is behind something in the foreground the camera will usually pick the closest object, which is not your intention, and you’ll end up with the wrong thing in focus. Find the setting that allows you to adjust which target focus zone the camera uses to focus. Depending on the camera make and model, that can usually be adjusted with a dial or joy stick on the back of the camera, while you are looking through the view finder. This frees you to choose the most appropriate zone or spot for your subject or scene.

Kitty Fisher's insight:

Having that crystal, sharp image can be hard to catch. But with a little know how and direction, those slightly blurred faces can become so sharp and clear...you may be amazed at your own skill. And the simplest way is to use a tripod and trigger release, but do not worry. The majority of us are just carrying around our SLR without the extra, use a ledge or flat surface instead.

No comment yet.
Scoop.it!

When You SHOULD Do Work for Free

When You SHOULD Do Work for Free | Mobile Photography | Scoop.it

Whenever somebody asks me if they should take a free job I answer with a resounding, no. Don't do it. Just don't. It should be a hard and fast rule in your book: do not work for free! But let's go head and look at when, perhaps, just maybe, you should at least consider working for free.

It’s hard to say no when a good friend needs a headshot, or wants to know if you can help their mom photograph some stuff for her work, or even when someone needs help shooting a school project. While non-profits and not-for-profit’s do pay their employees that doesn’t mean they have a bunch of money sitting around to pay for things like photographers. Thus, at one point or another, you’ll probably be asked to do some free work for one. Or student work, future possibilities in the field or when you simply believe in it.

Kitty Fisher's insight:

For a freelance photographer, knowing when you should charge and help out. Are to very close and different things. But when friends and family comes into the picture, you can't help but say no, no, you don't have to pay for that. But also when a future project, may be intact with an internship that doesn't pay...would you still consider taking it or not?

No comment yet.
Scoop.it!

How To Take Ridiculously Unique Photos

How To Take Ridiculously Unique Photos | Mobile Photography | Scoop.it

How do you make your photography more meaningful, moving and unique? Motivations significantly influence the quality of photography we create. Pleasing everyone doesn't work, which can lead to an uninspiring image.


Giving yourself a photography assignment, then narrowing focus.

I can still go take a photo of the Opera House, for example. But a pretty picture, which has also been taken by millions of people, won’t do now.

If I’m going to hold myself to account and really make this day about making a difference to someone through my photography, I’ll need to dig much deeper.


Creating Art, look at the issues surrounding it today (art vs politics, need for funding and redevelopment, modern society vs art, budget cuts, people who make it all work) and attempt to take photos which tell those stories in a powerful way.


Kitty Fisher's insight:

Taking a photo from a different prespective than the traditional and taking a unique approach to it, can be challenging in itself. How do we stand from another view to capture say a historical statue, but creating art as well. Not just documenting that we've been there and seen this?

This article is a perfect explain and gives fresh, new ideas.

No comment yet.
Scoop.it!

7 Essential Tips for Photographing the Moon

7 Essential Tips for Photographing the Moon | Mobile Photography | Scoop.it
Over the years, I have learned some tips for shooting the moon that are relatively unknown to most photographers. Learn to make stunning moon photos here!
Kitty Fisher's insight:

Since we can't afford a hubble telescope, being able to take a shot of the moon can be unreal. For the right insight, know how a telephoto lens my be the things you need.

No comment yet.
Scoop.it!

15 useful Photoshop shortcut commands | Design Dosage

15 useful Photoshop shortcut commands | Design Dosage | Mobile Photography | Scoop.it

Here are fifteen handy photoshop shortcut commands. They are handy in many occasions because you often have to move your mouse cursor in order to select a tool, but this means moving it from a position that may be difficult to find again. Plus, it becomes a very long process if you have to keep switching tools very often. The buttons are all shortcuts, and some of them work on web browsers too, such as Ctrl + Z and Ctrl + 0.


Kitty Fisher's insight:

Helpful and handy is right. Knowing simply what keys to press in accordance can ease the pain and trouble.

No comment yet.
Scoop.it!

101 for Fashion Photography - Tips & Examples - 121Clicks.com

101 for Fashion Photography - Tips & Examples - 121Clicks.com | Mobile Photography | Scoop.it
Guest Article by: Sara Coppola Being a fashion photographer might seem like an easy job full of freedom. Though, the reality is quite different.
No comment yet.
Scoop.it!

10 Amazing Light Painting Photographers You Should Start Following Right Now

10 Amazing Light Painting Photographers You Should Start Following Right Now | Mobile Photography | Scoop.it
Light Painting goes as far back as Pablo Picasso, and since the true formation of the medium with pioneers such as Dean Chamberlain, Eric Staller and Vicki DaSilva, there has been a mass of people trying their hand at the world of light painting...
No comment yet.
Scoop.it!

10 Tips on How to Create Better Black & White Images | BH Insights

10 Tips on How to Create Better Black & White Images | BH Insights | Mobile Photography | Scoop.it

Black and white was once the only means we had to communicate, photographically. That was long before most of us got involved with it. But for some of us, B&W is how we started off in photography, and how we saw our images in print. But since the beginning of photography, black and white has been a very romantic medium. That romance continues to this day, with black and white easier and simpler to do than ever. And yet, for some, it’s just as complicated and difficult as ever. Perhaps this will give you some ideas to advance your black and white photography.

No comment yet.