Mobile Photography
18.1K views | +0 today
Follow
Mobile Photography
News about mobile and digital photography, photo apps, effects, tips and photo galleries
Curated by Hovhannes
Your new post is loading...
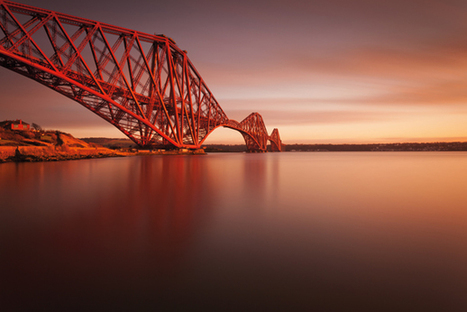
Scoop.it!

10 tips for taking better pictures of bridges | Landscapes, Photography Tutorials | PhotoPlus

10 tips for taking better pictures of bridges | Landscapes, Photography Tutorials | PhotoPlus | Mobile Photography | Scoop.it

01 Shoot in Raw
For maximum control when it comes to processing your images, always shoot in Raw. You’ll often be shooting high-contrast scenes, with dark bridges backlit by bright skies, and Raw files enable you to extract the maximum amount of shadow and highlight detail at the editing stage. You can fine-tune the white balance post-shoot too.

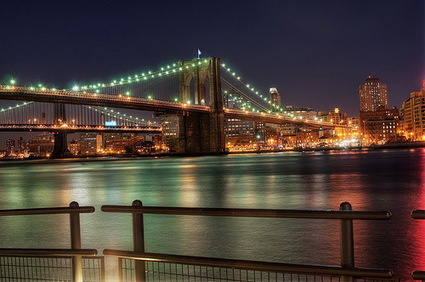
03 Camera accessories
A remote release is essential for hands-off shooting to avoid blurry shots. Use this in conjunction with the Mirror Lock-up Custom function to ensure that there’s no risk of camera shake. For more about remote controls, see this issue’s Help Me Buy feature on page 102.

04 Camera filters
To stop bright skies overexposing, use an ND grad filter to retain the detail and colour – but avoid positioning the filter over the bridge, otherwise it’ll look unnaturally dark. A polariser will decrease reflections and increase colour saturation, especially after rain, and is great for deepening blue skies.

Or for that sought-after wispy effect in water use a straight ND filter. A variable ND filter with a range of densities from one to eight stops will give versatility. Or use a 10-stop ND filter for really long exposures of 30 seconds and more – in daylight!

05 Focus and metering
If you’re using filters, such as a 10-stop ND filter, make sure you compose, focus and meter the shot before you fit the filter. This is because the camera will struggle to focus if it’s too dark.

If you do decide to meter with the filter fitted, it’s best to cover the eyepiece completely so it doesn’t affect the light reading. And remember to focus on the bridge – it may sound obvious, but that’s what you want the viewer’s eye to be drawn to.

Kitty Fisher's insight:

I haven't come across any tips for taking pictures of bridges, so I thought that this would be a great introductory into this particular situation.

From a 10-stop ND filter which will retain color and detail. Learning how to angle the camera so you do not overshadow or even underexpose the image. This article will be the setup you need to start taking those gorgeous bridge photos.

No comment yet.
Scoop.it!

Budget Studio photography using your Smartphone - Jeweller Magazine: Jewellery News and Trends

Budget Studio photography using your Smartphone - Jeweller Magazine: Jewellery News and Trends | Mobile Photography | Scoop.it

"Producing high-quality product photos of jewellery using smartphone cameras requires an understanding of exposure and focus, says studio photographer Lex McColl."

Interesting Content's insight:

This article teaches you how to use your smartphone's camera to create professional looking shots. It contains useful tips about getting the right exposure, lighting, and composition in your smartphone photos.

No comment yet.
Scoop.it!

Nexus 5 photography powers featured in new Google video clips

Nexus 5 photography powers featured in new Google video clips | Mobile Photography | Scoop.it

"The Nexus 5does not have the best camera among its peers, even with the presence of Optical Image Stabilization (OIS) technology. But that’s not stopping Google from trying to convince you that it’s more than good enough, mostly thanks to software features. Now the company has come out with three short video ads that show how even a decent quality camera can be fun."

Interesting Content's insight:

This article is all about what you can expect from the new Nexus 5 camera. It features 3 videos that showcase the various camera features, as well as some of the new software and hardware improvements.

No comment yet.
Scoop.it!

Quick Tips for Urban Photography After Dark - The Photo Argus

Quick Tips for Urban Photography After Dark - The Photo Argus | Mobile Photography | Scoop.it

Before heading out to get some great images of the city after sunset, it is important to make sure you have the proper equipment. This means that you should definitely have a flexible tripod that can adjust to varying heights; a wide-angle lens; some sort of lens hood or a system for directing the flash outside of the frame; and a game plan.


Urban areas can be dangerous locations in which to setup a camera and take a prolonged series of images. This is not due to the potential for a crime alone, but also because of busy streets, and the fact that people do not see well in the dark. This translates to the need for a photographer to select their target shots and consider the settings that their camera might need to make the images they want.


If the camera has a capacity for custom "presets" a photographer who makes a regular habit of nighttime photography might want to dial in these settings in order to make their work as easy as the tap of a button.

Kitty Fisher's insight:

Considering a body of water or a place like Time's Square for some Urban Photography. But the main rule is be careful in urban areas, not only are you out at dark but busy streets can be a problem. Selecting the image ahead of time, or just a general shot of what you would like to capture, would be a good beginning to your shots at night.

No comment yet.
Scoop.it!

Photographer Rigs Remote Car Camera to Get Very Up Close and Personal with Lions

Photographer Rigs Remote Car Camera to Get Very Up Close and Personal with Lions | Mobile Photography | Scoop.it

Most people try to avoid dangerous predators like lions, but photographer Chris McLennan’s clever remote camera setup allowed him—or rather, “Car-L”—to get in the faces of a pride of lions in Botswana and capture some otherwise-impossible shots.


The setup, designed by McLennan's friend Carl Hansen, consisted of an AquaTech Sound Blimp mounted to a 4x4 remote control buggy.


McLennan placed a Nikon D800E camera inside and the blimp, equppied with an 18-35mm lens. He set the camera to manual focus mode with high ISO and small aperature for "great depth of field," and he set the lens to a wide 18mm, knowing that he would have crisp focus at 1m.


The movement-triggered aggression of lions and other big predatory cats may be frightening, but it guaranteed the success of McLennan’s shoot. Not only did McLennan capture crisp, close-up shots in the faces of one or several lions, he received the opportunity of a lifetime when an entire pride of lions began stalking and fighting over Car-L.

Kitty Fisher's insight:

This bit of interesting know-how to capture wildlife up and close. McLennan has captured these lions in the limelight without risking too much except a camera on a little dune-buggy that was able to get as close as possible.

No comment yet.
Scoop.it!

Star Trail Photography Tips

Star Trail Photography Tips | Mobile Photography | Scoop.it

One of the lessons in the Photography Lab series I teach is a lesson on night photography, specifically shooting the stars. There are two essentials to know before going out to shoot stars your first time.


One: The Earth is rotating. This means you can photograph star constellations, but after about 15 seconds, you will start to get blurring in your stars because of the movement of the Earth.


Two: You should know a couple of constellations before you go out: the Big Dipper and Orion are the two I use to orient myself.


Why the Orion and The Big Dipper? First, they are extremely bright and easily found in the night sky. Second, besides being my favorite constellation, Orion is usually high enough in the sky to photograph with other stars around, but it can also sit low so you can get nice foreground elements in your compositions. Finally, use the two stars which make up the pouring end of the Big Dipper to find the North Star. Look at the bottom star in the dipper part of The Big Dipper, the non-handle end. Draw a from the bottom star in the dipper to the top star in the dipper, then continue this line until you see the Little Dipper. This line (and these two stars) point to the last star in the handle of the Little Dipper. Why is this important? The last star in the handle of the Little Dipper is Polaris – the North Star.

If you know where Polaris (The North Star) is located, you can point your camera in this direction and, using long exposure times, you will get circular star trails instead of blurry constellations.


When I shoot stars, I use 2 lenses: a Canon 10-22mm and a Tamaron 28-300 which I use in the 28mm – 80mm range. I set my camera to M (manual) and use the following settings:

  • Aperture: widest setting F2.8 / F3.5 / F5.0 depending on focal length
  • ISO: 100 or 200
  • Shutter Speed: BULB setting
  • White Balance: Auto or Tungstun
  • Focusing: Set focus to Manual / Infinity
Kitty Fisher's insight:

Star Trail Photography is a talent that involves knowing how to use your equipment and perfect timing. This article will bring you up to speed, especailly with Winter coming in full force. That snow capped cabin will look exquisite with the sky in full bloom, with these star trails.

No comment yet.
Scoop.it!

What’s the Future of Digital Photography?

What’s the Future of Digital Photography? | Mobile Photography | Scoop.it
Since the technique was first pioneered around 200 years ago, photography has developed to a state where it is almost unrecognizable.
Interesting Content's insight:

Digital photography has undergone a lot of changes in the past few years. It's now easier than ever to capture every moment of your life thanks to technology such as smartphones and compact digital cameras.


If you're interested in knowing what digital photography will look like in the future, this is an article you'll find interesting.

No comment yet.
Scoop.it!

The 6 most intriguing digital photography trends we saw in 2013 | What Digital Camera

The 6 most intriguing digital photography trends we saw in 2013 | What Digital Camera | Mobile Photography | Scoop.it
From cameraphones to full-frame sensors, we saw a lot of features come into fashion this year. Here are our picks of the most interesting trends of 2013
Interesting Content's insight:

Digital photography is still the best way to go if you want to capture the best looking pictures. This articles highlights some of the most significant changes in the world of digital photography this year.

No comment yet.
Scoop.it!

Parents Keep Their Kids' Imaginations Alive with Creative 'Dinovember' Project

Parents Keep Their Kids' Imaginations Alive with Creative 'Dinovember' Project | Mobile Photography | Scoop.it

Parents Refe and Susan Tuma aren't big on Movember, at their house November is reserved for a different tradition: Dinovember. Documented in photos on the project's Facebook page, the Tumas spend November keeping their kids' imaginations alive by convincing them that every night, their dinosaur toys come to life and get into all sorts of trouble.


The tradition started last year, and their Facebook page now boasts almost 250K followers who love to see what the dinos got into last night.


At it's most basic level, Dinovember is a whimsical photo series that makes for a fun way to spend November, but the Tumas are quick to point out that the point of the experiment goes beyond that.


Kitty Fisher's insight:

Creating an imaginative world for you kids can be a whole lot of fun. Then again, turning this month into what has now become 'Dinovember' has gained some ground. Check out this gallery of some hilariously placed dinosaurs.

No comment yet.
Scoop.it!

Evolution: Striking Black and White Photos of Vertebrate Skeletons by Patrick Gries

Evolution: Striking Black and White Photos of Vertebrate Skeletons by Patrick Gries | Mobile Photography | Scoop.it
Working in concert with the National Museum of Natural History in Paris, photographer Patrick Gries has put together a book/photo series packed full of striking black and white photographs of vertebrate skeletons — from tiny creatures to massive mammoths, his book Evolution covers a vast swath of vertebrate natural history.

In all, the book consists of 300 of these white on black skeletal photographs that took Gries six full months to shoot. The photos represent a coming together of art and science: even as the book chronicles millions of years of evolution, each individual photo is masterfully taken, with the skeletons arranged in poses that breathe life back into the bones.

Kitty Fisher's insight:

Check out this unbelievable gallery of skeletons, that Patrick Gries ended up photographing. While at the National Museum of Nautral History in Paris, he was able to put together a book series. Everything from the smallest creature to the mammoths that made history.

No comment yet.
Scoop.it!

20 Breathtaking Portraits from Greta Tuckute @ Weeder

20 Breathtaking Portraits from Greta Tuckute @ Weeder | Mobile Photography | Scoop.it

Greta Tuckute is a nineteen-year-old photographer located in Denmark with a passion for portraiture and travel photography. She has been shooting since the age of twelve, and she currently works in Copenhagen in order to develop her style and skills. Greta loves unique human features, trekking, swimming in lakes, good coffee, novels, art and traveling.

Kitty Fisher's insight:

Greta Tuckute has the talented eye of a veteran. Her initmate protrayal filters between black and white, colored and even a double image. Her majestic use of capturing light filtering down on her subjects has an etheral effect, while being stationed in urban areas.

No comment yet.
Scoop.it!

7 Tips for Photographing at the Zoo - Digital Photography School

7 Tips for Photographing at the Zoo - Digital Photography School | Mobile Photography | Scoop.it

Zoos … love ‘em or hate ‘em? I think it depends on the zoo. I much prefer open range zoos where the animals have tons of space to roam around and live almost as they would in the wild.


Choose the right zoo:


The type of zoo you choose makes all the difference to your photography (and to the animals). Zoos with large open areas for the animals to roam tend to make better photographs because the images look more natural when you cannot see any fences.


Wait for a special moment:


When the animals are right there in front of you don't just snap away because you can. When you have this opportunity to be so close to them try to be patient and wait for a special moment to make a unique image.


Dealing with fences and rails:


If you are at the kind of zoo with fences, you can use a wide aperture to reduce the depth of field which should make any fences out-of-focus. This is easier to achieve if there is greater distance between the animal and the fence.

It is also easier to make the fence disappear if it does not have direct light on it. Find a portion of the fence that is in the shade if it is in front of or behind your subject.

Kitty Fisher's insight:

Going to the zoo is always a pleasure. But getting those money shots can be derailed by a fence or something else. Picking a quality zoo would be the best choice, and since a lot of us can't make it to a safari get-away. This is the next best thing.

No comment yet.
Scoop.it!

Panorama Photography Ideas And Tips

Panorama Photography Ideas And Tips | Mobile Photography | Scoop.it

People Panoramas:


If you're out with a grup of friends or at a social gathering, a panorama is an interesting way of capturing a group portrait. Whether it be at a picnic, or just a get together at someone's house, a panorama is a unique way to include everyone in a photo with ease. Try using different poses and expressions to create a shot with is nore dynamic and fun.


Vertical Panoramas:


Vertical panoramas can be used to give vertical objects more presence. They are great for when you're capturing tall trees and buildings, as they give you a real sense of height and grandeur. It is also ideal for capturing waterfalls, wind turbines and windmills.


360 Degree Panoramas:


For something more quirky, try shooting a 360 degree panorama. You can but gadgets that do this or some cameras, such as the Nikon Coolpix P520, have 360/180 panorama modes built in. Don't worry if your camera doesn't have a 360 degree panorama setting, as you can stitch several panoramas together to create a similar look.

Kitty Fisher's insight:

Panorama shots are hard to obtain. If you have a wedding or a large group of people, this is your chance to really make a dynamic, appealing photo. Even better is the 360 degree panorama which has that 3D feel. Usually you'll see such photos in cities.

No comment yet.
Scoop.it!

Google Confirms that RAW Capability and Burst Mode are On Their Way to Android

Google Confirms that RAW Capability and Burst Mode are On Their Way to Android | Mobile Photography | Scoop.it

Last week, we reported the news that Android developer Josh Brown had discovered some juicy tidbits within the Google camera API: namely, that RAW capabilities and a few other features were in the works. That was just an interpretation of code, but now, it looks like Google has come out to confirm some of what Brown found.


The announcement was made by way of a CNET article in which Google spokeswoman Gina Scigliano confirmed that both RAW image capture and burst mode are already supported in Android's code, and will soon make their way to an upcoming API.


"Android's latest camera HAL [hardware abstraction layer] and framework supports raw and burst-mode photography," Scigliano said. "We will expose a developer API [application programing interface] in a future release to expose more of the HAL functionality."


Burst mode is actually already used in the Nexus 5 when taking HDR photos, but the release of an API would allow all developers to take advantage of both features and design more competitive photography apps that really take advantage of the camera hardware built into phones like the aforementioned Nexus, which left reviewers unimpressed when it was released.

Kitty Fisher's insight:

The two new HAL and API features in the Lumia 1020 and 1520 Windows Phone, google confirms the RAW capability as well as burst mode. All of these could be making, their way to Android as well. Also Android's latest camera supports raw and also more of the HAL functionality.

No comment yet.
Scoop.it!

9 photography accessories you never knew you needed | What Digital Camera

9 photography accessories you never knew you needed | What Digital Camera | Mobile Photography | Scoop.it
We probably don't need to tell you to buy a tripod, but here are a few clever gadgets and accessories you might not have thought about...
Interesting Content's insight:

This article lists some of the coolest accessories for your digital camera. You might be surprised by how awesome some of these accessories are!

No comment yet.
Scoop.it!

Photography Tips for a Daily Practice of Gratitude

Photography Tips for a Daily Practice of Gratitude | Mobile Photography | Scoop.it
After a number of years harnessing the power of photography in a way that has improved my entire outlook on life, I have wanted nothing more than to encourage other people to do the same. It doesn’t take much, just a little shift of perspective to get you seeing and in turn, shooting the world around you in a whole new light. And I can think of no better time of the year than this month to begin. Here are a few simple ideas to get you focusing on gratitude, one picture at a time.
Interesting Content's insight:

Photography is a great way to express your creativity and keep your best memories alive. Whether you're an amateur or pro, you can find a lot of inspiration by simply looking at pictures of moments you captured in the past.

This article adds a new perspective to photography by giving you advice on how to use the power of photography to improve the quality of your life.

No comment yet.
Scoop.it!

Photography Tips - How to Prevent Blurry Photos

Photography Tips - How to Prevent Blurry Photos | Mobile Photography | Scoop.it

Don’t fret, you are not alone – one of the most common basic pitfalls when learning photography is taking blurry photos.

This photography tips & tutorial is for you – to explain a bit about how  aperture and a camera’s shutter speed work and how you can take control of your camera’s settings and make sure you are getting sharp, not blurry photos.  If you are only using the lens that came with your camera, that too can be a problem for you, we got some tips and lens recommendations for you!

Kitty Fisher's insight:

Blurry photos has happened a couple times to each of us. This tip and tutorial video will show you how to quit taking blurry photos. Between the aperature and shutter speed, it could also come down to camera shake as well.

No comment yet.
Scoop.it!

Expect The Unexpected: Tips for Working With Children @ Weeder

Expect The Unexpected: Tips for Working With Children @ Weeder | Mobile Photography | Scoop.it
Expect The Unexpected: Tips for Working With Children

Working with a child is a lot like dealing with the weather. It’s unpredictable, temperamental and has the potential to wreck your entire shoot. At the same time, huge risk can mean huge reward. Children add an undeniable “cute” factor that will always have a place in advertising or event videos/photography. Unlike the weather, there are a few steps we can take to increase our chances of success when working with children. Photographer Jay P Morgan recently shot photos for California’s Prestige Preschool Academy and put together a video with some great tips on how to be successful while working with children.


1. Schedule

2. Be patient

3. Be persistent

4. Lay on the floor

5. Show them the images

6. Interact with them

7. Bribe them

8. Shoot when they don’t see you shoot

9. Be spontaneous

10. Shoot Fast

11. Don’t get distracted

12. You cannot shoot enough

13. Bring extra shirts

14. Bring simple props

Kitty Fisher's insight:

Expect the unexpected, what do you do with information like that. There are 14 tips, that are listed on this article that give a good reason, what to expect with children. When you are filming a music video or photographing a group of kids, what will you need on hand to keep everyone happy.

No comment yet.
Scoop.it!

Camerapocalypse: How photography’s titans will survive smartphones

Camerapocalypse: How photography’s titans will survive smartphones | Mobile Photography | Scoop.it
Burdened with problems and smartphones that are eating their lunch, camera makers face extraordinary challenges. However, they're also making amazing gear.
Interesting Content's insight:

Competition from smartphones is forcing photography companies to rethink their entire product lines. This article describes some of the challenges these companies face and what they are doing about the changing photography landscape.

No comment yet.
Scoop.it!

Foldio: The Uber-Portable, Foldable Light Box for Smartphone Photography

Foldio: The Uber-Portable, Foldable Light Box for Smartphone Photography | Mobile Photography | Scoop.it

"It’s called Foldio, and it’s an ultra-portable (foldable in fact) light box for smartphone shutterbugs who want to add a new dimension to their work or take some professional-looking product shots."

Interesting Content's insight:

Foldio is a new accessory that gives smartphone users the ability to take high quality products shots on-the-go. This article explains what features you can expect from this innovative product.

No comment yet.
Scoop.it!

How Important is Style in Photography?

How Important is Style in Photography? | Mobile Photography | Scoop.it

First, I'd like to start this article off with a little bit of a warning. This post is primarily aimed at people just starting to get into photography or people just beginning to make the jump from hobbyist to professional. That said, hopefully there's something below that can be appreciated by photographers of all levels.


fter experimenting a little bit — and by experimenting I mean desaturating the heck out of everything or filtering through any Lightroom preset I could find (yes, I was young, dumb, and very naive) — I wasn’t pleased with my results. Simply put, nothing felt right.

Kitty Fisher's insight:

How important is style? This article explaining from one point of view, demonstrates. Just how special, it is to having your own style because eventually it does become your signature.

No comment yet.
Scoop.it!

The King of Awkward Digital Photographs

The King of Awkward Digital Photographs | Mobile Photography | Scoop.it

Sometimes, it seems like technology has turned us all into "expert" photographers. Most smartphones come equipped with pretty good cameras, and Instagram lets us edit with the swipe of a finger.

In that context, Chris Maggio's images seem out of place. Maggio is a professional photographer, but his shots remind me of the pictures my parents took with their very first digital camera in the early aughts. In a way, they're remarkably forgettable. And that's what makes them fascinating.

A lot of people call some of the images I take 'consumer,'" he explains. "Why does that term have to possess such a bad connotation? I really love amateur photography, particularly in the rapid-sharing age of Flickr, and it's been a huge influence on me."

Maggio's pictures are more about telling stories and capturing strange moments than dramatic angles and colorful filters. In that way, he challenges us to think about what makes a good digital picture. One of his most popular projects, "Male Chef," consists of meals that appear to be completely inedible and unappealing. Others tell the story of people having fun in Tokyo, land use in America, or bizarre Craigslist postings.

Kitty Fisher's insight:

Even the awkward moments need a photographer. And Chris Maggio made sure that he would be the man for the job. While we may have been either to shocked or too embarrassed to take the photo. But Maggio is more about telling stories.

No comment yet.
Scoop.it!

The Weekly Round Up: The Perfect Product Shot, Is the iPhone Good or Bad for Photography and See Photographically in 6 Steps

The Weekly Round Up: The Perfect Product Shot, Is the iPhone Good or Bad for Photography and See Photographically in 6 Steps | Mobile Photography | Scoop.it

For this end of the week round up, you will learn what you can do to shoot the perfect product shot. Also if you are new to the game, there are 6 ways you can train your eye to see the shot, which in itself goes with Product Photography. And the ultimate question no one wants to ask...is the iPhone good or bad for the photography business?


When it comes to Product shots, you need precise angles, lighting and a background that will make your product eye popping. What can you do to sell your object? have you tried an unusally but flattering angle or even hanging them from the ceiling? Most of all, one important rule...create a story. No one is going to go out their and buy your jewerly if it just sits on a table...they want to know who it's going to and who gave the ring to who.

http://inspirationfeed.com/photography/get-the-perfect-shot-product-photography-tips-and-tricks/


iPhones have been brought into question, are they destorying a well loved art form? With the over use of food photographs and make-up shots. And with the popularity of iphongraphy contests and galleries showing up around the world. Lately there has been talk about DSLR's going extinct. Now there are apps that will touch up the image to the utmost ideal vision. Yet we've lost touch with the traditional hands on "darkroom" that taught you the mechanics of every possible angle, a photograph could turn out to be.


http://blogs.phoenixnewtimes.com/jackalope/2013/11/iphone_photography_art.php


How can you see photographically? Well this article may help but you will need to keep developing your eye to keep up with your skill. A big rules of thumb that will make it a bit easier is, using lines. Using lines to direct your eye contact to the focus point. A favorite is utilizing negative space to tell a story, also black and white may be the first images that will come out great. But it'll be color that will be the harder attraction. Once you've learned a few tricks and tips to use these 6 steps, you'll be on your way.


http://digital-photography-school.com/start-see-photographically-5-easy-steps


Likely this weekly round up will be a tool you can use in your own work. Between the Product Photography and how to select the right strategies. Or how the battle between iPhone and the art world of photography...may be at odds. Then for the finale, those of you that need help or that are new, 6 ways to help step up your game. Stay tuned with more ideas and helpful tips for next week.

No comment yet.
Scoop.it!

Start to See Photographically In Six Easy Steps

Start to See Photographically In Six Easy Steps | Mobile Photography | Scoop.it

Start to See Photographically with these six easy steps by photographer Valerie Jardin. 


See the light

Play with def=”http://digital-photography-school.com/book/naturallight”>light and shadows. Be aware of the quality of light around you (hard versus soft light) and its effect on objects, buildings, etc. The more aware you become of the quality and quantity of light, the better you will be at harnessing it and making it work for you, no matter the time of day.

Express your vision with basic composition rules

There are many ways to express your vision and they all start with the decisions you make before you press the shutter.

Use focus point and depth of field

The obvious way to lead the eye of the viewer is by focussing on the subject and using the right depth of field so that there is no mistake as to where the eye should go. It only takes a fraction of a second to lock your focus and recompose. You have to put some thought into it and soon you will make quick decisions that will make your images stronger.

Using color

Just like using focus point to draw the eye, using color is another powerful compositional tool. Alternatively, because color draws the eye, it is also a reason to convert your color image into B&W to remove distracting colorful elements and make stronger images!

Negative space

The clever use of negative space makes stronger images as it puts more emphasis on the subject (positive space).

Kitty Fisher's insight:

Developing that photographic eye can take time. How about we give you some tips on how to see the "light" of possible images? One that I learned right off the bat, was to make use of the negative space that could penetrate your view finder. It also will add a stronger connection to the viewer and the image.

No comment yet.
Scoop.it!

Get the Perfect Shot: Product Photography Tips and Tricks | inspirationfeed.com

Get the Perfect Shot: Product Photography Tips and Tricks | inspirationfeed.com | Mobile Photography | Scoop.it

Most photographers already know the basics of product photography – getting the right lighting, using a white background, changing the camera focus and getting close-up shots. But most of them only know these simple tricks.


The same angles across several product photos create a generic, plain, and sometimes boring display. It’s a good idea to mix things up in order to achieve variety and uniqueness between different products and product types. It would be ideal to have different angles at least on every product type.


Create a Story or Scene

Having a story behind a product photo will most likely make it more attractive and interesting. People are intrigued by the scene or story behind a photo. In short, it stimulates ‘eye to brain’ interaction. However, it should be kept in mind that creating a scene requires various props or more objects inside a photo. Be sure not to shift the viewers attention away from the actual product itself. Remember that soft lighting (fewer shadows) should be maintained despite the additional props within the photo.

Go Macro

In a series of photos, having a few macro shots within them makes a very good photo bundle. It makes the series more eye-catching and drool-worthy. It allows better focus or a better look at important features of a product. It also gives a product photo a better sense of attention to detail.


Kitty Fisher's insight:

We never think about 'product' shots. How do you set it up, what do you want to sell or what story do you want to come across? Or did you know that depending on the background you pick, that alone can make it the product more desirable.

No comment yet.