Mobile Photography
18.1K views | +0 today
Follow
Mobile Photography
News about mobile and digital photography, photo apps, effects, tips and photo galleries
Curated by Hovhannes
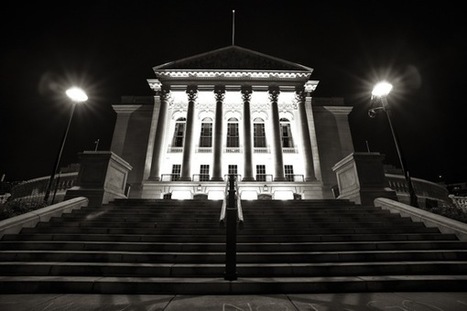
Your new post is loading...
Scoop.it!

How an Exploding Meteor Turned a Great Shot Into a Once-in-a-Lifetime Photograph

How an Exploding Meteor Turned a Great Shot Into a Once-in-a-Lifetime Photograph | Mobile Photography | Scoop.it

I’ve been shooting photos for 20 years. I’ve made my living in the profession for the last 15. I can count on one hand the number of times that everything lines up perfectly and a truly rare image was created.


Now, I don’t want to toot my own horn about this shot, but the fact that, during a 30 second exposure, after a 10 second timer (during which I hopped down from the roof of my truck where the camera was on a tripod, and joined the scene by the fire), a meteor (or so they tell us) would enter the sky EXACTLY in the corner of the frame and explode in the very part of the frame that needed balance, just as I had finally worked out the correct exposure and lighting to match the foreground with the night sky, is beyond rare. It’s a non-chance. There is no way to plan for something like this. No way to even hope for it.

But lest you get the impression that I’m subscribing to a lifestyle of reliance on freakish luck, there is a deeper game at play here. Namely this: If you shoot enough arrows, eventually you’ll pull a Robin Hood and split the arrow that was already a bulls-eye. When I took this shot, it was the final day of my project shooting fall landscapes in the American West. Five weeks previous, I had left Seattle in my truck with no mission beyond creating and sharing beautiful photography as I chased good weather almost all the way to the Mexican border.

Every morning, I was up shooting the sunrise. Every night, I was posted up somewhere scenic to shoot the close of another day in the great outdoors. From the Olympic rain forest to the Tetons, Yosemite to Zion, I was on an epic hunt. And, to be perfectly honest with you, toward the end of the trip, despite the thousands of images taken, and the extremely enthusiastic feedback from the world at large, I was disappointed that I hadn’t captured a single transcendent image; an image that would make me want to burn my camera, a la Jimmy Hendrix.

Kitty Fisher's insight:

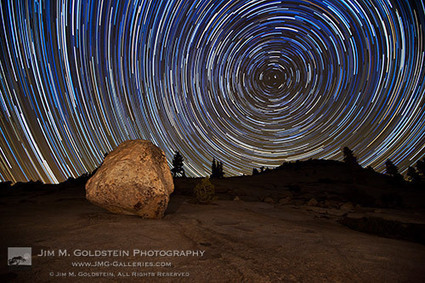
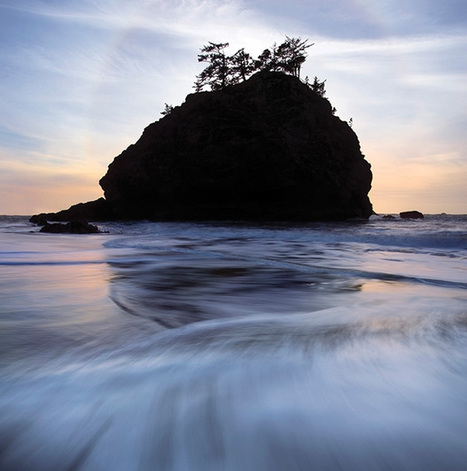
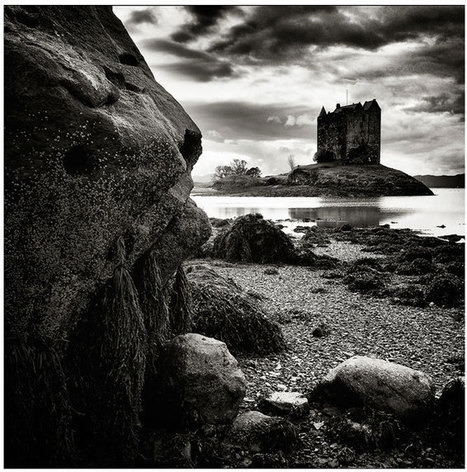
Here is a bit of Inspiration for a Wednesday morning, the ultimate photobomb, an exploding meteor. There was no planning for this event, this was purely by chance. This photograph just goes to show that some times, you are just in the right place at the right time.

No comment yet.
Scoop.it!

Nightscapes: Photographing the City at Night - Digital Photography School

Nightscapes: Photographing the City at Night - Digital Photography School | Mobile Photography | Scoop.it

By Joseph Eckert The idea of taking photographs at night can be counterintuitive to the novice photographer. After all, photography is an art, a craft, a technology that is wholly built on light. 

Night, of course, by very definition lacks the pervasive light of day, and therefore doesn’t seem like a good time for photography. In the broadest sense, this intuitive understanding of light and its importance to photography is absolutely correct. Night does represent a more challenging time to take pictures, because we lack all those wonderful photons barreling down from the sun and reflecting off everything interesting and into our waiting lenses.


Take a moment, tonight, or whenever you have a chance, and go outside into the darkness long after the sun has gone down. Really open your eyes and observe, noting all the differences, all the unique things that set night apart from day. It is as simple as the lack of sunlight, but infinitely more complex than that breezy statement would suggest.

Pay attention to the way the shadows have deepened and pooled, how colors are muted or rendered differently by the artificial light of streetlamps or the exposed bulb on your backyard porch. Notice how things feel, how significant just changing the time of day can be. That old oak tree that seems so friendly and comforting in the day can turn into a gnarled, malevolent specter at night. Or a car that during the day is simple and boring might become a gleaming chariot in the darkness. The possibilities are endless.

Bring the Right Gear

I’m not going to categorically deny that you can take great nightscapes with a compact digital camera. I will say that using a point and shoot is going to make getting that fantastic image of your dreams a lot harder.

I recommend the following:

• Tripod, sturdy but lightweight enough for you to carry around easily
• DSLR
• Remote shutter release
• Relatively fast wide angle lens (the wide angle part is optional, but what I recommend to get the most dramatic shots of the architecture and streets of your city)
• Lens hood (to reduce lens flare from outside-the-frame light sources)


Kitty Fisher's insight:

Taking night time photos of a city or a building, are easily one of the more beautifully grouped images. But also having the right gear can aid in that helpful promise of completing a set that you would want to showcase.


No comment yet.
Scoop.it!

Beginner photography tips: common problems with composition and framing | Digital Camera World

Beginner photography tips: common problems with composition and framing | Digital Camera World | Mobile Photography | Scoop.it

In the final part of our series looking at common problems that plague new photographers we turn our attention to composition and framing.


Unlike the more technical aspects of photography such as exposure or focusing, choosing how to compose and frame your shots is as much about personal choice as being right or wrong. Despite this, there are ways to improve the composition of your images. The classic habits to break are putting the main subject in the centre of the frame, and not getting close enough to the subject.

Simple tips for composing a photograph

Below we’ll show you a couple images that don’t quite work for a number of reasons, and then slightly different versions of each that do.


Including subjects at the edge of the image:


You need to watch out for areas of the subject, especially at the edge of the frame, which draw attention away from the main subject. Before you press the shutter, try looking all around the frame for anything that doesn’t help the composition.


Uninteresting foreground:


Shooting with a wide-angle lens means that you will often include a large area of the foreground. So you should look out for interesting subjects or textures to make the most of this area of the image.

Kitty Fisher's insight:

A beginner just holds a camera and points and shoots. Because that's all we know for the time being. Until we decide to learn that framing and composition have a massive part in photography. Simple tips like having the horizon at an equal level. And if your camera has a grid display, it will help you out.

No comment yet.
Scoop.it!

5 Tips To Transform Your Photography With Long Exposures - Digital Photography School

5 Tips To Transform Your Photography With Long Exposures - Digital Photography School | Mobile Photography | Scoop.it
Create Atmosphere

Use long exposures to create an ethereal atmosphere. Weather conditions are often thought of as static, but in reality they shift and change slowly.  In many instances these changes occur too slowly to be held in our visual memory, but our camera can record these changes. Misty, foggy or smokey scenes can be created with moving clouds, surf, etc.


Discover Hidden Movement

We are often so rushed that we seldom pause to take note of slow moving subjects. Once you start to look for slow moving subjects you quickly open a door to a new world of photo opportunities. Clouds, shadows, stars, plants and even people or animals make great long exposure subjects.

Create Using A Canvas of Light

While your camera shutter is open your sensor or film is in essence a canvas. Normally that canvas is open very briefly but with longer exposures the light running over your sensor acts a brush. If you let a scene unfold before you with your shutter open it is “painted” onto the sensor yielding blurs of light. If you work in an environment where there is little light you can manually paint light into a photo with strobes, flashlights, cell phones, etc. to create a unique image.


Kitty Fisher's insight:

Lon Exposure Photographs are some of the toughest images to figure out how to capture. Using a tripod or a flat surface to set your camera on, you can immerse yourself and viewers alike with dazzling lights and cityscapes.

No comment yet.
Scoop.it!

Why Take Photographs? by Lou Jones

Why Take Photographs? by Lou Jones | Mobile Photography | Scoop.it

Everyone has their own reasons for taking pictures. All valid. But even so, photography is the world’s universal language. No need for translation. 


To Be Creative. Since it's inception photography has engaged some of the most creative minds. And some of the most bizarre, too. And although it was under pressure in the early years to justify itself as an art form, most museums today have photography collections and understand its historic and aesthetic contributions. Social networking sites like PicsArt, Facebook, and Instagram have opened up new opportunities to showcase


To document

There are not many truly creative photographs being made. Most people just want to capture moments of their new baby, wedding, graduation, gathering, party, “selfie”, etc. Photography serves as the easiest and most convenient way to remember. You do not have to know how to spell RAW or PhotoShop to get competent results.

To be trendy

Photography has been popular since Kodak made it easy. But the digital revolution has made it accessible for all. The cameras are simpler, cheaper. More pictures are taken with cell phones than all cameras. It is a universal hobby. Anybody can do it. Even hipsters.

To tell stories

It doesn’t matter if you’re a professional or an amateur. You don’t need formal training. But we can most accurately tell the big and little stories of our own lives, of those surrounding us and of those far away. The more we know about each other, the more we see, the better we understand and cope.

Kitty Fisher's insight:

The simple question, "Why do we take photographs?" Lou Jones puts your mind at ease and to the test. I believe it's good to know, where you stand. If you are unsure that's alright as well, you'll find your reason.

No comment yet.
Scoop.it!

Scoopshot scoops $3.9M to crowdsource news photography via 350,000 global users

Scoopshot scoops $3.9M to crowdsource news photography via 350,000 global users | Mobile Photography | Scoop.it

Helsinki-based Scoopshot announced today that it has raised $3.9 million in a Series A round of funding to continue growing its crowdsourced photography business globally. The company uses its growing army of 350,000 users to quickly get on-demand news photography for more than 60 publishers, including News Corp and the California Newspaper Publishers Association. Organizations such as Greenpeace also use the services to capture breaking events, as do brands like Nokia.


Scoopshot allows media and companies to crowdsource mobile photos in minutes, setting geolocation boundaries to indicate which photos they're interested in.


"In three years, Scoopshot has already become the clear market leader in crowdsourced images for brands and publishers," Chris Barchak, a partner at Conor Venture Partners, one of the Scoopshot's investors, said in a statement. "Its on-demand service completely changes how we think about digital image sales, combining the afforable cost of stock photography with the specificity of commissioned work."


The deal follows a $1.2 million seed round just three months ago by the world’s top-selling stock photographer, Yuri Arcurs.

“This … will strengthen our position as a market leader in on-demand mobile photography” said Petri Rahja, CEO and founder of Scoopshot. “Expanding our sales and marketing teams and establishing an expanded presence in the US will allow us to revolutionize the photo industry with our on-demand model.”

Kitty Fisher's insight:

Well this is a brilliant conclusion. Scoopshot is keeping photography alive and bringing it to the lime light. Using their on-demand model to keep up with stock photography. It allows media and various companies to crowdsource the photos in minutes.

No comment yet.
Scoop.it!

How Do You Photograph a Jet Flying 300-400mph? Throw 30,000W of Flash at It!

How Do You Photograph a Jet Flying 300-400mph? Throw 30,000W of Flash at It! | Mobile Photography | Scoop.it

Yuri Acurs, the world's top-selling microstock photographer, will go to great lengths to prove he's right, and the video above is a great case in point for that. He wanted to prove that he could flash freeze a fighter jet at full speed, and he got that shot. ALl he needed was appromimately 30,000Wof filll flash... no big deal.


For those unfamiliar with how studio lighting usually works, 30,000W is as much as 100 times more flash than you're going to typically use in a regular studio setting. So muh flash power being thrown at this jet that the people on the ground can actully feel the heat from the lights.


Apparently, the project started as "A heated in-house discussion about flash speeds [and] ended up becoming a rather BIGGGG experiment..." An experiment that ended with Acurs getting his shot and proving his point.

Kitty Fisher's insight:

Impressive doesn't cut it. This seems near to impossible. Using 30,000W to prove a point, seems a bit far fetched but Yuri Acurs, did exactly that. Capturing a fighter jet in mid-air at full force. But it is coming down to, was this too much trouble or was this one of those ideas that became an incredible reality?

No comment yet.
Scoop.it!

7 Photography Tips for Shooting Interiors Like a Pro

7 Photography Tips for Shooting Interiors Like a Pro | Mobile Photography | Scoop.it

Learn how to make any interior space shine with these expert photography tips.


Choose the Right Perspective. Interior Photography calls for taking a couple of steps back and shoot from one of the corners, or with the camera pressed against the walls. When you scope out the space you are about to photograph, try all different corners for a variety of persepectives, and only then choose to focus on the on that captures the room at it's best.


Wide Angles, when you want to capture as much of the space as possible, a wide angle is the way to go. For a good wide angle, you will need to use specialized gear. Most experts agree that a lens ranging from 16mm to 24mm will give you an optimal wide shot of the interior. Too wide will result in perspective distortion, through, so make sure you get a lens that is appropriate for the range of space sizes you intend to photograph.


Eliminate Blurring, even if you have the steady hands of a surgeon, there's no reason to risk blurry images. You want to keep your indoor photos sharp, so it's best to use a tripod. As an extra stabilizing measure, use your camera timer to make sure the shot it untainted by any movement that might be caused by your excited fingers.


Kitty Fisher's insight:

With the involvment of Interior shots, it can get somewhat messy and unprofessional. And no one wants that. Even if you have to slip into a bath tub just to get the mirror framed right, do so. A different perspective can adjust the whole area of the room, in seconds.

No comment yet.
Scoop.it!

Playing With White Balance To Create Interesting Images

Playing With White Balance To Create Interesting Images | Mobile Photography | Scoop.it

Playing with white balance to create interesting images.


Gear Suggestions:


A camera where you can adjust the white balance makes life easier. This could be a DSLR or compact such as Nikon's new COOLPIX P7800 which has various white balance settings, including custom white balance if none of the pre-sets give you the look you're after.

Once you've found the camera's white-balance control, take a look at your manual if you're unsure where the white balance options are, do try the various settings on offer as each one will give a slightly different look to your image. Most cameras have the following white balance settings: auto, cloudy, daylight, incandescent, fluorescent and flash.


Technique:

Much of this is you playing with the various presets – or in Photoshop afterwards.

One of the most obvious is shooting with the incandescent setting in daylight to give blue-coloured images. In film days, fashion pros used to use tungsten-balanced colour film in daylight. With digital, you can try this without risking anything and if the effect looks wrong, switch back to auto white-balance and try something else.

Most cameras have the option of using Kelvin. You could set a low value and shoot in normal daylight. The effect can be very pronounced and will enhance the mood of suitable scenes. There is no right or wrong when it comes to experimenting.

Kitty Fisher's insight:

With the setting on incandescent while it's still daylight. Giving off that bluish tint, but digital will be taking a risk. If this setting does not work, switch to an auto white-balance and figure out another way. It takes time getting use to a camera's settings. You can even play with the white balance on your RAW files.

No comment yet.
Scoop.it!

Digital Cameras Ideas – Digital Cameras – Simplifying Photography | DIGITAL CAMERAS PROS

Digital Cameras Ideas – Digital Cameras – Simplifying Photography | DIGITAL CAMERAS PROS | Mobile Photography | Scoop.it

Digital Cameras - Simplifying Photography - Human race want to socialize. They like to spend more time with their loved ones. Primarily, they wish to cherish some time they spend with their near ones. Further, the creation of these tools has engendered the photography era. It is nice to possess a good quality time and it's best of all to have the memories almost daily spent as part of your reach. The technological boom has indeed helped a guy to possess his good time preserved.
Within this modern era, where each second surpasses the prior one, its has become true to remain active in the days. These tools have helped anyone to include magic to his fingers. They've got indeed simplified the entire process of photography. Searching for camera usually takes still photographs or can record videos or both.

This method is finished by digit? recording the images on a light sensitive sensor.
Many of the digital camera models are affordable as well as cheap and they are capable enough to capture sound combined with moving pictures as well. These cameras are gaining commendable public recognition these days and many have outsold their 35 mm counterparts. Besides, these cheap digital cameras incorporate some special features besides the other don't have any. For instance, these cameras can readily give a thought towards person taking photographs, what sort of final copy look. These cameras display an image within the camera's screen immediately once it has been taken.

Kitty Fisher's insight:

Simplifying is an assest that we don't take into consideration. Too much color, or too much involved in the background or even the foreground can cause a chaotic collision. This little bit of information, helps re-affirm that simple makes a striking photo.

No comment yet.
Scoop.it!

Understanding Lighting: Front Light, Back Light & Side Light

Understanding Lighting: Front Light, Back Light & Side Light | Mobile Photography | Scoop.it

Photography is all about light. Without light, no matter how dim, you wouldn’t be able to make a photograph. However, that doesn’t mean that that’s all there is to photography.


The simplest of light's qualities is its direction relative to your camera. There are essentially three directions: frontal, side and backlighting. The three directions have a different effect on how three-dimensional your subject appears to be due to the that shadows are cast.


Frontal Lighting:


Is lighting that emanates either from brhind the camera of from the camera itself. Built-in or on-camera flash is a frontal light. Frontal lighting has one big advantage. It evenly illuminates your subject so metering is fairly straightforward. However, it tends to flatten a subject. The shadows cast by frontal light are behind the subject, out of sight from the camera's point of view. Shadows help to give a sense of shape and form to a subject. WIthout shadows a subject's shape becomes more ambiguous. Shadows can also add drama to a photo. Frontal light lacks drama, making a photo look more like a record shot and be less interesting for this reason.


Side Lighting:


Is light that falls on a subject at roughly ninety degrees to the camera. This means that one side of a subject will be lit and the other side will be in shadow. In terms of helping to convey a subject's shape and form this is ideal. Of the three directions, side lighting creates the strongest sense that a subject has three dimensions. There's always a catch however. The catch in this instance is contrast. side lighting doesn't evenly illuminate your subject.


Kitty Fisher's insight:

From side lighting to frontal and back lighting. Figuring out that side lighting consists a ninety degree angle. Where a back lighting creates the result of a silhouette. But front lighting can make an image flat, unless you create a bit of side lighting to give depth.

No comment yet.
Scoop.it!

5 Composition Tips For Better Nature Photography

5 Composition Tips For Better Nature Photography | Mobile Photography | Scoop.it

A snapshot shows the world what your camera sees, but a thoughtfully composed photograph shows the world what you see. While composition can be complex, several basic strategies arise when making pictures of natural subjects.


One of the most effective ways to create a powerful composition is to use visual elements to lead the viewer's eye into the scene. Leading elements can be just about anything - lines, curves, or a progression of shapes. Leading lines that stretch from foreground to background are especially powerful, propelling the viewer into the scene.


Foregrounds add depth, and the best add punch, too. Providing a point of reference, they can simplify chaotic scenes. At this placid pool of water during a fiery sunrise, I backed up to incorporate the curving shoreline. Its shape frames the reflection of the mountains, enhancing the composition and adding depth to the image.


People are naturally attracted to patterns, part of our ability and biological need to organize our chaotic world. When the eye explores one, it tends to want to visit each and every repeated element; accordingly, the savvy photographer can use repeating shapes and colors to encourage the viewer to visit multiple parts of the composition. Visual repetition gets the viewer’s eye moving, engaging interest and creating compositional energy.
On the flip side, repetition can also help create harmony and balance, adding structure to a composition, as well as to create order in an otherwise chaotic scene.
You can also create effective images by making the pattern itself the entire focus of the composition, as I did with the quirky shapes and patches of color in the little pond seen here. The less dynamic shapes of the lily pads floating in the water fade to the background, providing general structure and order for an otherwise energetic, chaotic collection of visual elements.

Kitty Fisher's insight:

Nature and Landscape photography can equally be relaxing or a nightmare. But one thing you can ease your mind towards would be creating a powerful composition. Making sure that the foreground is eye catching or lines that draw your eye to the 'pop' part of your image. Can attract inspiration and professional praise.

No comment yet.
Scoop.it!

Canon Japan Releases DSLR Teaser Video, Talks of a 'White Kiss Debut'

Canon Japan Releases DSLR Teaser Video, Talks of a 'White Kiss Debut' | Mobile Photography | Scoop.it

At the end of last week, Canon Korea teased a new camera in an ad that showed what seemed to be a DSLR hidden behind a semi-see through sheet. Now, adding fuel to the fire (albeit a small fire) that the Korean branch of the company started, Canon Japan has released a teaser video about the same camera.


As teasers go, this one is a bit on the sad side. No deep message, no man in the Scottish highlands on a  "journey of self-discovery," just a pair of white lips wishing you a Merry Christmas. The title, however, does give something away.


The Canon Rebel DSLRs are known as the Kiss lineup in Japan, and so the video confirms this will be a new consumer-level DSLR (no $3,000 retro shooter from Canon..yet). The two main camera, and if you look at the photo at the top you'lll understand why.


Put together by dicahub, that image shows how the camera under the sheet in the original teaser perfectly fits the SL1's outline, with a few minor exceptions. Those exceptions could be the result of shooting angle, or hint at the fact that his is indeed a followup with some minor aesthetic tweaks.


Kitty Fisher's insight:

The teaser videos keep coming. And that means your Christmas wish list may need some adjustments or it's going to be filled this year. Canon Watch seems to believe that this 'White Kiss" camera my just be the white version to the Rebel cameras already in production. But we know better, that with Japan...this could possibly be a high advanced version of the camera that may dazzle us for some time.

No comment yet.
Scoop.it!

Diply.com - Create Your Own Heart-Shaped Bokeh

Diply.com - Create Your Own Heart-Shaped Bokeh | Mobile Photography | Scoop.it

Lately, the combination of a busy school schedule and my addiction to Instagram has resulted in serious camera-neglect.  I've found little time and reason to take the ol' DSLR out.  So when I saw ...

No comment yet.
Scoop.it!

How a mysterious Chicago nanny became one of the most important street photographers

How a mysterious Chicago nanny became one of the most important street photographers | Mobile Photography | Scoop.it

Vivian Maier is hailed as one of the greatest street photographers of the last century, yet she remainedl relatively unknown until recently. 


Details of her life are murky, but she was born in New York City in the 1920s to European parents. Maier grew up in France before returning to the U.S., where she spent several decades working as a nanny in Chicago to wealthy families. During her days off Maier is thought to have taken more than 100,000 photographs of people and city scenes in Chicago, yet she kept the photos to herself – many of them never developed.

Skip ahead to 2007, a Chicago historian and collector, John Maloof, stumbles upon Maier’s work by accident after purchasing a box of tensof thousands of undeveloped negatives for $380 at an auction. As he developed them, Maloof realized they were more than just photos. He was looking at evocative art depicting a Chicago of the mid-20-century that nobody had never seen. Maloof worked to uncover who the photographer was, acquiring more and more of her work. But before he could locate her, Maier had already passed away in 2009, having slipped on ice and never recovering from her head injury.

Other collectors began to acquire Maier’s photos, but Maloof owns much of her work. He released a book, Vivian Maier: Street Photographer, in 2011, and his documentary, Finding Vivian Maier, came out this year.


Kitty Fisher's insight:

I heard about Vivian Maier a while back and she has always intrigued me. As an inspiring photographer, she somehow was able to capture all these remarkable images, without anyone knowing that she was a photographer. Her life was shrouded in mystery until the recent documentary, Finding Vivian Maier came out this year.

No comment yet.
Scoop.it!

Black & White Photography Techniques

Black & White Photography Techniques | Mobile Photography | Scoop.it

Black and white photography is a rewarding and challenging field of artistic photography. Even people who don’t care about photography can find themselves drawn to a great black and white image. As a photographer, black and white can allow you to discover a whole new character in a familiar subject. For many digital photographers, black and white photography is nothing more than colour photography converted by software. It is a matter for your own judgement whether this is effective for your photographs.


Black And White Photography Tip #1. Choosing A Subject. Some subjects lend themselves to colour but are not nearly so effective in black and white. For example, sunset photographs rely on the colour of a great sky for their impact, and rarely produce a good black and white image. Colourful birds, flowers, fashion…there are many times when the only logical approach is to shoot your subject in colour. On the other hand, some subjects are ideally suited to black and white photography.

Because this is an ‘old-fashioned’ medium, it often works well with old-fashioned subjects. Rustic items like old farm equipment, a tumble-down shack, an old wooden fence can all be great subjects for black and white photos.

When photographing people, age can also be a factor. A close-up portrait of an aged face showing all the lines and creases of their years on earth can have much greater impact in black and white.

Kitty Fisher's insight:

Potential may be the word here that will get you pretty far, with black and white photography. Having a mind set that you want to shoot in black and white, will help with your choosing of what image will convert easier to the monochrome filter.

Taking a portrait of an older person can have a greater effect, showing their age through the black and white image.

No comment yet.
Scoop.it!

Is the iPhone Good or Bad for Photography? - Phoenix New Times (blog)

Is the iPhone Good or Bad for Photography? - Phoenix New Times (blog) | Mobile Photography | Scoop.it
Phoenix New Times (blog)
Is the iPhone Good or Bad for Photography?

Via Geri Centonze
No comment yet.
Scoop.it!

9 Weird Photography Tricks That Actually Work! -

9 Weird Photography Tricks That Actually Work! - | Mobile Photography | Scoop.it
No tripod?  Use a lamp!

Want to take a group photo but don’t have a place to set the camera?  Just whip the lamp shade off a lamp and screw your camera onto the lampshade-holder.

The thread size of the bolt on a lamp shade is exactly the same size as the filter thread used on tripods, so your camera will easily attach.

Not only will your party and indoor pictures look better, but you’ll look like MacGyver in front of the group.  Not bad.


Take your lens off for macro photography

This is the coolest camera trick I’ve seen in a long time.  If you take off your lens and hold it in front of the camera, you get a macro lens!  I was really skeptical about this, but I just tried it and it worked like a charm.

There are four things you need to know about using this trick: (1) Your camera won’t take a picture with the lens off unless you’re in manual mode.  (2) The best focal length seems to be around 50mm, so either a 50mm prime or an 18-55mm kit lens would be perfect! (3) Obviously, you lose autofocus since your lens isn’t attached to the camera.  Focus is achieved by simply moving closer to or further away from the subject, and (4) The camera can’t open up the aperture, so you’ll do it with your hand.  On the back of the lens (the side you mount on the camera), move the little plastic slider piece that controls the aperture.  If you look in the lens while doing it, you’ll see the hole open up.

If you want to take this a step further, you can buy a reverse lens mount for $5 or $10 which should sharpen up the images quite a bit since it will hold the lens more solidly.  Also, be sure to use a tripod when doing this or any other macro photography.  With such fine detail, even a tiny movement can destroy the sharpness.

Kitty Fisher's insight:

Have you ever wondered...how did so and so do that? Or take that photograph? Need a tripod, no big deal use your lamp. Crazy to think about, but it works and honestly if you just need something to stand up your camera without having to by a tripod for that moment. This is your solution. Maybe the solution for your needs is one of these strange tricks.

No comment yet.
Scoop.it!

Tips For Shooting Interiors Like A Pro, Subject Placement Tips and The Pelican Smartphone

Tips For Shooting Interiors Like A Pro, Subject Placement Tips and The Pelican Smartphone | Mobile Photography | Scoop.it

Interior Photography has it's ups and downs. But these tips make the most of any room situtation. Choosing the right perspective is the most crucial of them all. With that in mind, trying a wide angle lens can very much capture the setting in a beauitful cabin like way. It would be in this moment that using a tripod would be the best way to capture the image. Eliminate that blurring possibility and you will receive a beautiful interior image.


Staying in the middle, with subject placement...can be the downfall for your photography. Getting creative and going off of the normal beaten path can lead to extraordianry striking images. The rule of thirds greatly applies to this theory, as it did with the Greeks. Many think that having a person or object right smack dap in the middle will do something extra for your photo. But it does the opposite, having it a bit off centered will give it a great story.


This smartphone called Pelican may just throw every other phone off board. It uses a system of 16 lenses to capture several images to stitch together that one single image that has perfect focus. With that in mind think about the fact that you would be able to move someone from the background to the foreground. How is that possible? Just on a phone nonetheless. Of course the size and quality makes you want to place this on any list of requirements. Watch out for Pelican Imaging.

No comment yet.
Scoop.it!

Canon Japan Releases the Rumored 'White Kiss,' a White Version of the Rebel SL1

Canon Japan Releases the Rumored 'White Kiss,' a White Version of the Rebel SL1 | Mobile Photography | Scoop.it

After a couple of teasers from Canon Korea and Canon Japan, the promised 'white kiss' camera officially arrived last night. Unfortunately, it seems the camera turned out to be the least exciting of the options rumor sites were bandying about: a white version of the Rebel SL1 that is otherwise unchanged.


The camera claims the title of first ever white Canon SLR, and for now is only set to release in Japan. Interested buyers in the region will be able to pick one up starting the 28th of November in a kit with either the standard 18-55mm lens, or a matching white version of the Canon EF 40mm f/2.8 pancake lens.

Kitty Fisher's insight:

Well that was a bit disappointing, and we are not the only ones. Japan's release of the 'White Kiss' Canon Rebel SLR twin, has only changed it's outer exterior. Which is nothing to fret about. And at this point it will only be sold in Japan.

No comment yet.
Scoop.it!

How To: Use Colored Flour and Strobes to Create Powerful Portrait Photography

How To: Use Colored Flour and Strobes to Create Powerful Portrait Photography | Mobile Photography | Scoop.it

Ever wanted to take some high speed photos of flour flying through the air? 


PhotoExtremist has put together a very interesting tutorial about how to set-up, light, shoot, and edit a high-speed photoshoot using colored flour. It's a surprisingly basic setup for what amount to some pretty impressive looking images.


You can see the entire thing below, but it's essentially a pretty straight forward. The flour is colored using holi powder, and flung at the model by an assistant. The scene was lit with a beauty-dished strobe from the front, and teo rear speedlights slaved into the system. That provided enough light to capture a high-speed image of the flour flying.


Photographer Evan Sharboneau also went through the substantial editing he did with the images, often times radically changing the color and spahe of the photo in order to get the final image he was looking for.


So it you're up for a project that's going to require some heavy cleanup, but could create some fantastic images.

Kitty Fisher's insight:

I had to introduce this cool bit of high-speed powder photography to the masses. Yes it will require some cleanup but the imagery is far from ordinary. This is a tutorial on how to set up, light, shoot and an extremely high speed shutter.

No comment yet.
Scoop.it!

Steve Gosling Scottish Highlands Photography Workshop

Steve Gosling Scottish Highlands Photography Workshop | Mobile Photography | Scoop.it

Steve Gosling Scottish Highlands Photography Workshop. Pro landscape photographer Steve Gosling will be holding a 2-day photography workshop in the Scottish Highlands.

Attendees will visit some of Steve's favourite spots in the Glencoe area and the event gives participants the chance to try out the Olympus OM-D camera and lenses as well as receive top photographic tips and advice from Steve Gosling. In addition, a discount voucher for Olympus gear will be given to all who attend.

The course runs from Tuesday 26 November 2013 - Wednesday 27 November 2013 and is priced at £100. Please note that accommodation, meals and transport are not included.

Kitty Fisher's insight:

How would you feel about getting lessons from a Pro in the Scottish Highlands? Now I know this is just for the individuals that live close by but I thought I should bring this to your attention anyway. This is a wonderful opportunity.

No comment yet.
Scoop.it!

How it was done - zooming the exposure - Digital Photography School

How it was done - zooming the exposure - Digital Photography School | Mobile Photography | Scoop.it

How it was done - zooming the exposure. Tips on how to create a fun and abstract image by zooming your lens during a long exposure.


Zooming during a long exposure tips

  • Works well on night scenes and ones with many light sources
  • Set up your camera on a tripod with a remote trigger or release
  • Set your camera to Manual mode
  • Set your focus by zooming in all the way, then lock the focus (using either back button focus or focus using Auto-focus and then switch it off to Manual focus)
  • Zoom out so you can see the whole image as you want it framed
  • Then start your exposure and zoom your lens out while the shutter is opened (you may need to practice a few times to make it go smoothly)
  • Experiment with different zooming speeds and timing, as example: if you exposure is 5 seconds do one with 3-4 seconds at the beginning, then zoom at the end; then do another when you zoom immediately and do most of the exposure at the end
  • Exposure must be 2 seconds or longer to make this work, otherwise it becomes really tricky to zoom
  • If it is too bright to get a 2 second exposure, make sure your ISO is as low as your camera goes and your aperture is set to your smallest setting (f/22 or f/32). If it is still too bright you may need to use a Neutral density filter to cut down the amount of light coming through the lens
Kitty Fisher's insight:

These type of images have that illuminated, everlasing quality. Step by step you'll learn how to set up your camera and tripod up right to create an image as such.

No comment yet.
Scoop.it!

More Tips on How to Take Sharp Photos

More Tips on How to Take Sharp Photos | Mobile Photography | Scoop.it
OK, now. Here’s part two of my series on how to take sharp photos – with more tips on keeping your camera steady. You can support your camera on a tree, a lamp post or something of this kind. But what’s next?
No comment yet.
Scoop.it!

Subject Placement Tips in Photography

Subject Placement Tips in Photography | Mobile Photography | Scoop.it

This should be one of the most obvious things in an image yet many people have absolutely no idea as to where it should go. Most people take their subject and place it slap bang in the middle thinking that is the right place to go.


Despite what I have said in my intro about centrally placed subjects, there is a place for it in photography, just that it works in limited ways. Subjects ike people portraits can work well with a central subject. Other subjects or objects like buildings that are symmetrical work well as do cars taken from the front and subjects cropped tightly. Be careful though that you use central placement in a limited way in your photo taking.


If you want to place a subject in the middle of an image try to off center it just a little so that it's not right in the middle. This will help make a more pleasant image.


Take a look for yourself at a photo of travel magazine and see how many of the images use this rule. But, not only do these points help create a great image but the vertical or horizontal lines do the same. If you have a tall object or a person standing up then place it or them on one of the two vertical lines. The same goes for a landscape image with a horizon.The horizon should always lie on one of the horizontal lines and not in the middle, creating a striking landscape photo.

Kitty Fisher's insight:

Subject Placement in Photography will always be debated. Some believe in the rule of placing your object directly straight forward in the center. While placing your object or subject slightly off balance can make the imgae more invoking. But over all I believe that it comes down to your intuitive decision.


No comment yet.